どうも、リーフです!
今回はCentOS6.7に、PHP5.6、MySQL5.6、Apacheをインストールし、
LAMP環境を構築する方法を紹介していきたいと思います。
前回などは古いバージョンのLAMP環境を構築して来ましたが、
今回は割と新しいバージョンで行きます。
それでは、構築していきましょう。
今回設定する内容
【1】Apacheのインストール
【2】MySQLのインストール
【3】PHPのインストール
Apacheのインストール
まずは、Apacheからインストールしていきます。
特にバージョンのこだわりは無いので、今回も「yumコマンド」にてインストールしますが、
今回は最新バージョンを取得していくので、yumをアップデートしていきます。
yumアップデート
1 | [root@test ~]# yum -y update |
アップデートが終わったらApacheをインストールしていきます。
Apacheのインストール
1 | [root@test ~]# yum -y install httpd httpd-devel |
正常にインストールが完了したか確認する為に、一度バージョンを表示させてみます。
Apacheバージョンの確認
1 2 3 | [root@test ~]# httpd -v Server version: Apache/2.2.15 (Unix) Server built: Jul 12 2017 13:32:34 |
バージョンが表示されたら、Apacheを起動し、ついでに自動起動の設定もしていきます。
Apache起動
1 | [root@test ~]# service httpd start |
自動起動の設定
こちらの設定をすると、サーバの再起動時にApacheが自動で起動するようになります。
1 | [root@test ~]# chkconfig httpd on |
1 2 | [root@test ~]# chkconfig --list httpd httpd 0:off 1:off 2:on 3:on 4:on 5:on 6:off |
ここまででApacheのインストール作業は完了です。
Apacheのインストールが正常に完了している場合、
ブラウザにIPアドレスを入力するとテストページが確認できますが、
確認する前に、iptablesの設定を確認しましょう。
ここで拒否する設定になっている場合は、テストページが表示されません。
※iptablesとは、Linuxのファイアウォールのことです。
iptables許可ポートの確認
1 2 3 4 5 6 7 8 9 10 11 12 13 14 15 | [root@test ~]# iptables -L -n --line-number Chain INPUT (policy ACCEPT) num target prot opt source destination 1 ACCEPT all -- 0.0.0.0/0 0.0.0.0/0 state RELATED,ESTABLISHED 2 ACCEPT icmp -- 0.0.0.0/0 0.0.0.0/0 3 ACCEPT all -- 0.0.0.0/0 0.0.0.0/0 4 ACCEPT tcp -- 0.0.0.0/0 0.0.0.0/0 state NEW tcp dpt:22 5 REJECT all -- 0.0.0.0/0 0.0.0.0/0 reject-with icmp-host-prohibited Chain FORWARD (policy ACCEPT) num target prot opt source destination 1 REJECT all -- 0.0.0.0/0 0.0.0.0/0 reject-with icmp-host-prohibited Chain OUTPUT (policy ACCEPT) num target prot opt source destination |
今回の設定では、SSH接続に使用するポート「22番」しか許可されていない状態なので、
Apacheで使用するポート「80番」を許可する設定を追加します。
ついでに、SSLで使用されているポート「443番」も追加しておきましょう。
iptables許可ポートの追加
1 2 3 4 | [root@test ~]# iptables -I INPUT 5 -m state --state NEW -p tcp --dport 80 -j ACCEPT [root@test ~]# iptables -I INPUT 6 -m state --state NEW -p tcp --dport 443 -j ACCEPT [root@test ~]# service iptables save [root@test ~]# service iptables restart |
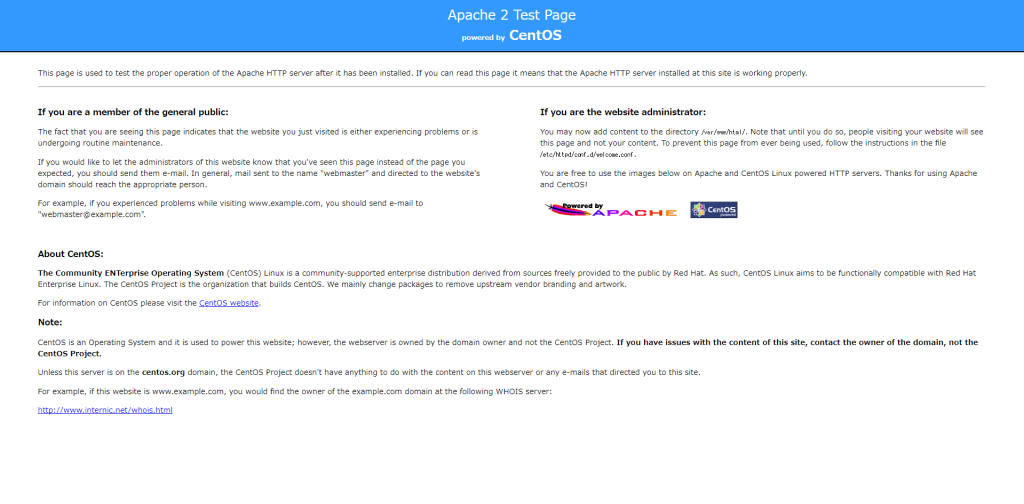
これで、ブラウザでApacheのテストページが確認できるようになりました。
確認してみましょう。
下記のようなページが表示されたら、正常にインストールが完了しています。
MySQLのインストール
MySQLもyumコマンドで簡単にインストールを終わらせたい所ですが、
今回使用したい「5.6」というバージョンはCentOS6.7では標準でインストールされません。
そのためrpmパッケージを使用して、インストールしていきます。
特にバージョンは気にしないよって方はこちらのコマンドでインストールできます。
1 | [root@test ~]# yum -y install mysql mysql-devel mysql-server |
5.6を使用したい方はrpmパッケージでのインストール作業をしていきましょう。
rpmパッケージでのMySQLインストール
まずは、ファイルをダウンロードするので、適当なディレクトリに移動します。
1 | [root@test ~]# cd /var/tmp |
移動したら、rpmパッケージをダウンロードします。
1 | [root@test tmp]# curl -OL http://dev.mysql.com/get/mysql-community-release-el6-5.noarch.rpm |
rpmパッケージを使用してMySQLをインストールしていきます。
1 2 | [root@test tmp]# yum -y localinstall mysql-community-release-el6-5.noarch.rpm [root@test tmp]# yum -y install mysql mysql-devel mysql-server |
インストールが完了したら、バージョンを確認しましょう。
MySQLバージョンの確認
1 2 | [root@test tmp]# mysql --version mysql Ver 14.14 Distrib 5.6.37, for Linux (x86_64) using EditLine wrapper |
バージョンが表示されたら、MySQLを起動し、ついでに自動起動の設定もしていきます。
MySQLの起動
1 | [root@test tmp]# service mysqld start |
MySQLの自動起動設定
1 | [root@test tmp]# chkconfig mysqld on |
1 2 | [root@test tmp]# chkconfig --list mysqld mysqld 0:off 1:off 2:on 3:on 4:on 5:on 6:off |
次に、MySQLの初期設定をしていきます。
MySQLの初期設定
1 | [root@test tmp]# mysql_secure_installation |
このコマンドを実行すると、いろいろ聞かれるので軽く解説していきます。
| Enter current password for root (enter for none): |
|---|
| rootパスワードが設定されていないので、そのまま「Enter」押下。 |
| Set root password? [Y/n] |
| rootパスワードを設定するので、「Y」を選択。 |
| New password: |
| 新しいパスワードの設定。 |
| Re-enter new password: |
| 新しいパスワードの再入力。 |
| Remove anonymous users? [Y/n] |
| 誰でもログインできるユーザを削除する為、「Y」を選択。 |
| Disallow root login remotely? [Y/n] |
| rootでMySQLにリモートログインを許可しないので、「Y」を選択。 |
| Remove test database and access to it? [Y/n] |
| testデータベースは不要の為、「Y」を選択。 |
| Reload privilege tables now? [Y/n] |
| 上記設定による権限の変更等を即時反映したいので、「Y」を選択。 |
MySQLの初期設定も終わったので、使用できるか試してみましょう。
MySQLの実行
1 2 3 4 5 6 7 8 9 10 11 12 13 14 15 | [root@test tmp]# mysql -u root -p Enter password: Welcome to the MySQL monitor. Commands end with ; or \g. Your MySQL connection id is 16 Server version: 5.6.37 MySQL Community Server (GPL) Copyright (c) 2000, 2017, Oracle and/or its affiliates. All rights reserved. Oracle is a registered trademark of Oracle Corporation and/or its affiliates. Other names may be trademarks of their respective owners. Type 'help;' or '\h' for help. Type '\c' to clear the current input statement. mysql> |
上記のような表示がされたら、正常に実行されています。
PHPのインストール
PHPも「5.6」を使用したいのでrpmパッケージを使用して、インストールしていきます。
理由はMySQLと同様です。
特にバージョンは気にしないよって方はこちらのコマンドでインストールできます。
1 | [root@test ~]# yum -y install php php-mysql php-xml php-pear php-pdo php-cli php-mbstring php-gd php-mcrypt php-common php-devel php-bcmath |
5.6を使用したい方はrpmパッケージでのインストール作業をしていきましょう。
rpmパッケージでのPHPインストール
まずは、ファイルをダウンロードするので、適当なディレクトリに移動します。
1 | [root@test ~]# cd /var/tmp |
移動したら、rpmパッケージをダウンロードします。
1 | [root@test tmp]# curl -OL http://rpms.famillecollet.com/enterprise/remi-release-6.rpm |
rpmパッケージを使用してPHPをインストールしていきます。
1 2 | [root@test tmp]# yum -y localinstall remi-release-6.rpm [root@test tmp]# yum -y install --enablerepo=remi,remi-php56 php php-mysql php-xml php-pear php-pdo php-cli php-mbstring php-gd php-mcrypt php-common php-devel php-bcmath |
インストールが完了したら、バージョンを確認しましょう。
PHPのバージョン確認
1 2 3 4 | [root@test tmp]# php -v PHP 5.6.31 (cli) (built: Jul 6 2017 08:16:47) Copyright (c) 1997-2016 The PHP Group Zend Engine v2.6.0, Copyright (c) 1998-2016 Zend Technologies |
バージョンが表示されたら、初期設定をしていきます。
PHPの初期設定
1 | [root@test tmp]# vi /etc/httpd/conf/httpd.conf |
ファイルを開いたら「/DirectoryIndex」で検索し、変更していきます。
1 2 3 | DirectoryIndex index.html index.html.var ↓変更 DirectoryIndex index.html index.html.var index.php |
「/AddType」で検索
1 2 3 4 5 | ↓追加 # # PHP-types # AddType application/x-httpd-php .php |
「/LoadModule」で検索
1 2 | ↓追加 LoadModule php5_module modules/libphp5.so |
上記の修正が終わったら、Apacheを再起動します。
1 | [root@test tmp]# service httpd restart |
これでPHPが使用できるようになったと思うので、確認してみます。
PHPの実行確認
まず、ディレクトリを移動します。
1 | [root@test tmp]# cd /var/www/html |
次に、PHPファイルを作成します。
1 2 3 4 | [root@test html]# vi phpinfo.php <?php echo phpinfo(); ?> |
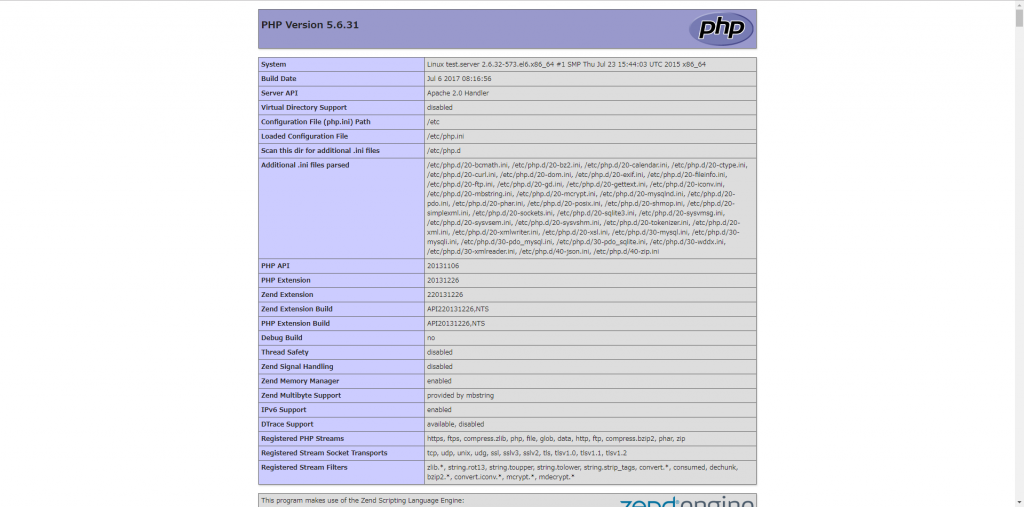
作成できたら、「http://IPアドレス/phpinfo.php」で接続してみます。
下記のようなページが表示されたら、PHPが正常に動作しています。
まとめ
今回は、CentOS6.7にLAMP環境を構築する方法を紹介しました。
まだ、勉強中な為、間違えている部分もあるとは思いますが、参考にしていただければと思います。
それでは、今日はこの辺で失礼します。

